Posts

Epson Technical Support Helps With How To Insert a Print Server Port?

Image
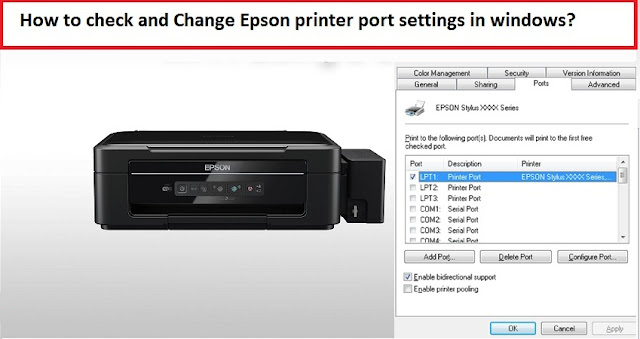
Install the driver to the system at first and ensure the print is appropriate and direct. In case your Epson has two or more ports, choose the button L along with the number of printer port used.  Are you facing problems while attaching the driver? We recommend you to follow the steps provided below quickly to clear your viewpoint of how to place it well.  Epson Support provides the hacks to place your port Choose the start link and navigate to the Control Panel.  Move towards the printers and faxes link.  Over the link, choose the properties.  On to the printer property window , choose for the tabs to port and then, insert the same. Click over the standard TCP or IP port and click over the new one. It will bring up the standard IP port wizard. Then, move to the next option. Into the field for printer’s name , place the Internet Protocol address and go to next.  Customize the same and alter the settings. A dialog box will appear on the screen. Choose LPR in

Troubleshooting Slow Printing In Windows Via Epson Printer Support

Image
If your Epson printer is printing slowly or it takes too much time to start printing, then this problem needs to be rectified on time, so that you can start printing without wasting much time. Please note that if you want  high-quality  photo-print, then it may take more time to print as compared to a normal plain paper with text. If printing for plain paper takes too much time, then you need to follow the given steps: Firstly, close all the unwanted software opened on your desktop. Especially high processing software and then try printing again. To check the problem with the printer or computer, execute a printer operating check. This can be verified if the sheet prints within 30 seconds.  Make sure that the data cable which is used for printing is less than 1.8 meters long and is straightly connected to the computer. Long cables and indirect connection creates communication problem and slow printing. Open the Print window and check that the paper type is selected correctly

How to change Ink Cartridges in Epson CX7450?

Image
Stylus CX7450 is an all-in-one product of Epson that not only prints but is also capable of Scanning and copying. It is slightly different from other models as it uses four ink Cartridges, having a black cartridge and others being yellow, magenta and cyan. There is a notification alert whenever the ink is low. You get an alert when the LED light at the ink drop icon stops flashing. We understand that new users might find it difficult to change the cartridge for the first time; therefore, we have simplified the process into some easy to follow steps provided by Epson Customer Support Service . You will need to replace the cartridge even if a single one is empty.  Measures to replace the cartridge on Epson CX7450 Hold up the device by the sides  Now press the Stop button. It will bring the cartridge holder to the center. Press the Stop button once again to align the empty cartridges with droplet image You will have to hold the cover and pull it up after they have reached

Take The Help of Epson Support To Begin With The Spooler Services

Image
 Files are sent from one PC to another through a service of print spooler which converts the data to a format only a technical device of Epson Printer could understand. Though Epson is a renowned brand in the name of printers manufacturing high-quality inkjet printers at affordable rates, it can encounter errors too. If you are experiencing any error in your Epson, you are required to begin with manually starting the spooler service in the device. In case you need an expert advice regarding the matter, do not hesitate to reach Epson Tech Support and get issues solved within few minutes of reach. Our support team is available all round the clock to comb the tangles faced by users in their product. Sign-in to your PC with an account having an administrative privilege. Only administrators can begin or stop any system service. Get access to the start menu and hit the option of the control panel. Approach the link of administrative tool and double-click on the

How to Clean Epson printer’s Clogged Print Head?

Image
  With the time, the quality of the print considerably decreases and this partially depends on the print head that allows the ink to properly flow from the ink cartridge to the paper. A clogged and dirty print head interfere with the flow of ink, this is why a proper cleaning of the print head is always necessary. So the experts at Epson Printer Support advice you to clean it when you notice the quality of the printed documents have declined. Cleaning by using self-cleaning application Move to the bottom left corner of the screen and hit the “Start” button and open control panel, locate the device and printer option, it should the right side of the page. You can also find this option under the hardware and sound option; you can see the list of the external device here. Select and right-click on the name of your device and choose “Properties”. A new window will appear, click hardware and maintenance tab at the top right of the page, i